
Implementar seguridad OAuth en API REST de Spring con GitHub
flowchart TD
    A[Cliente] --> B["/oauth2/authorization/github"]
    B --> C[Redirect GitHub]
    C --> D[Usuario autoriza]
    D --> E[Callback con code]
    E --> F[Spring intercambia por access_token]
    F --> G[Resource Server valida]
    G --> H["JWT firmado / SecurityContext"]
    H --> I[Endpoints API protegidos]
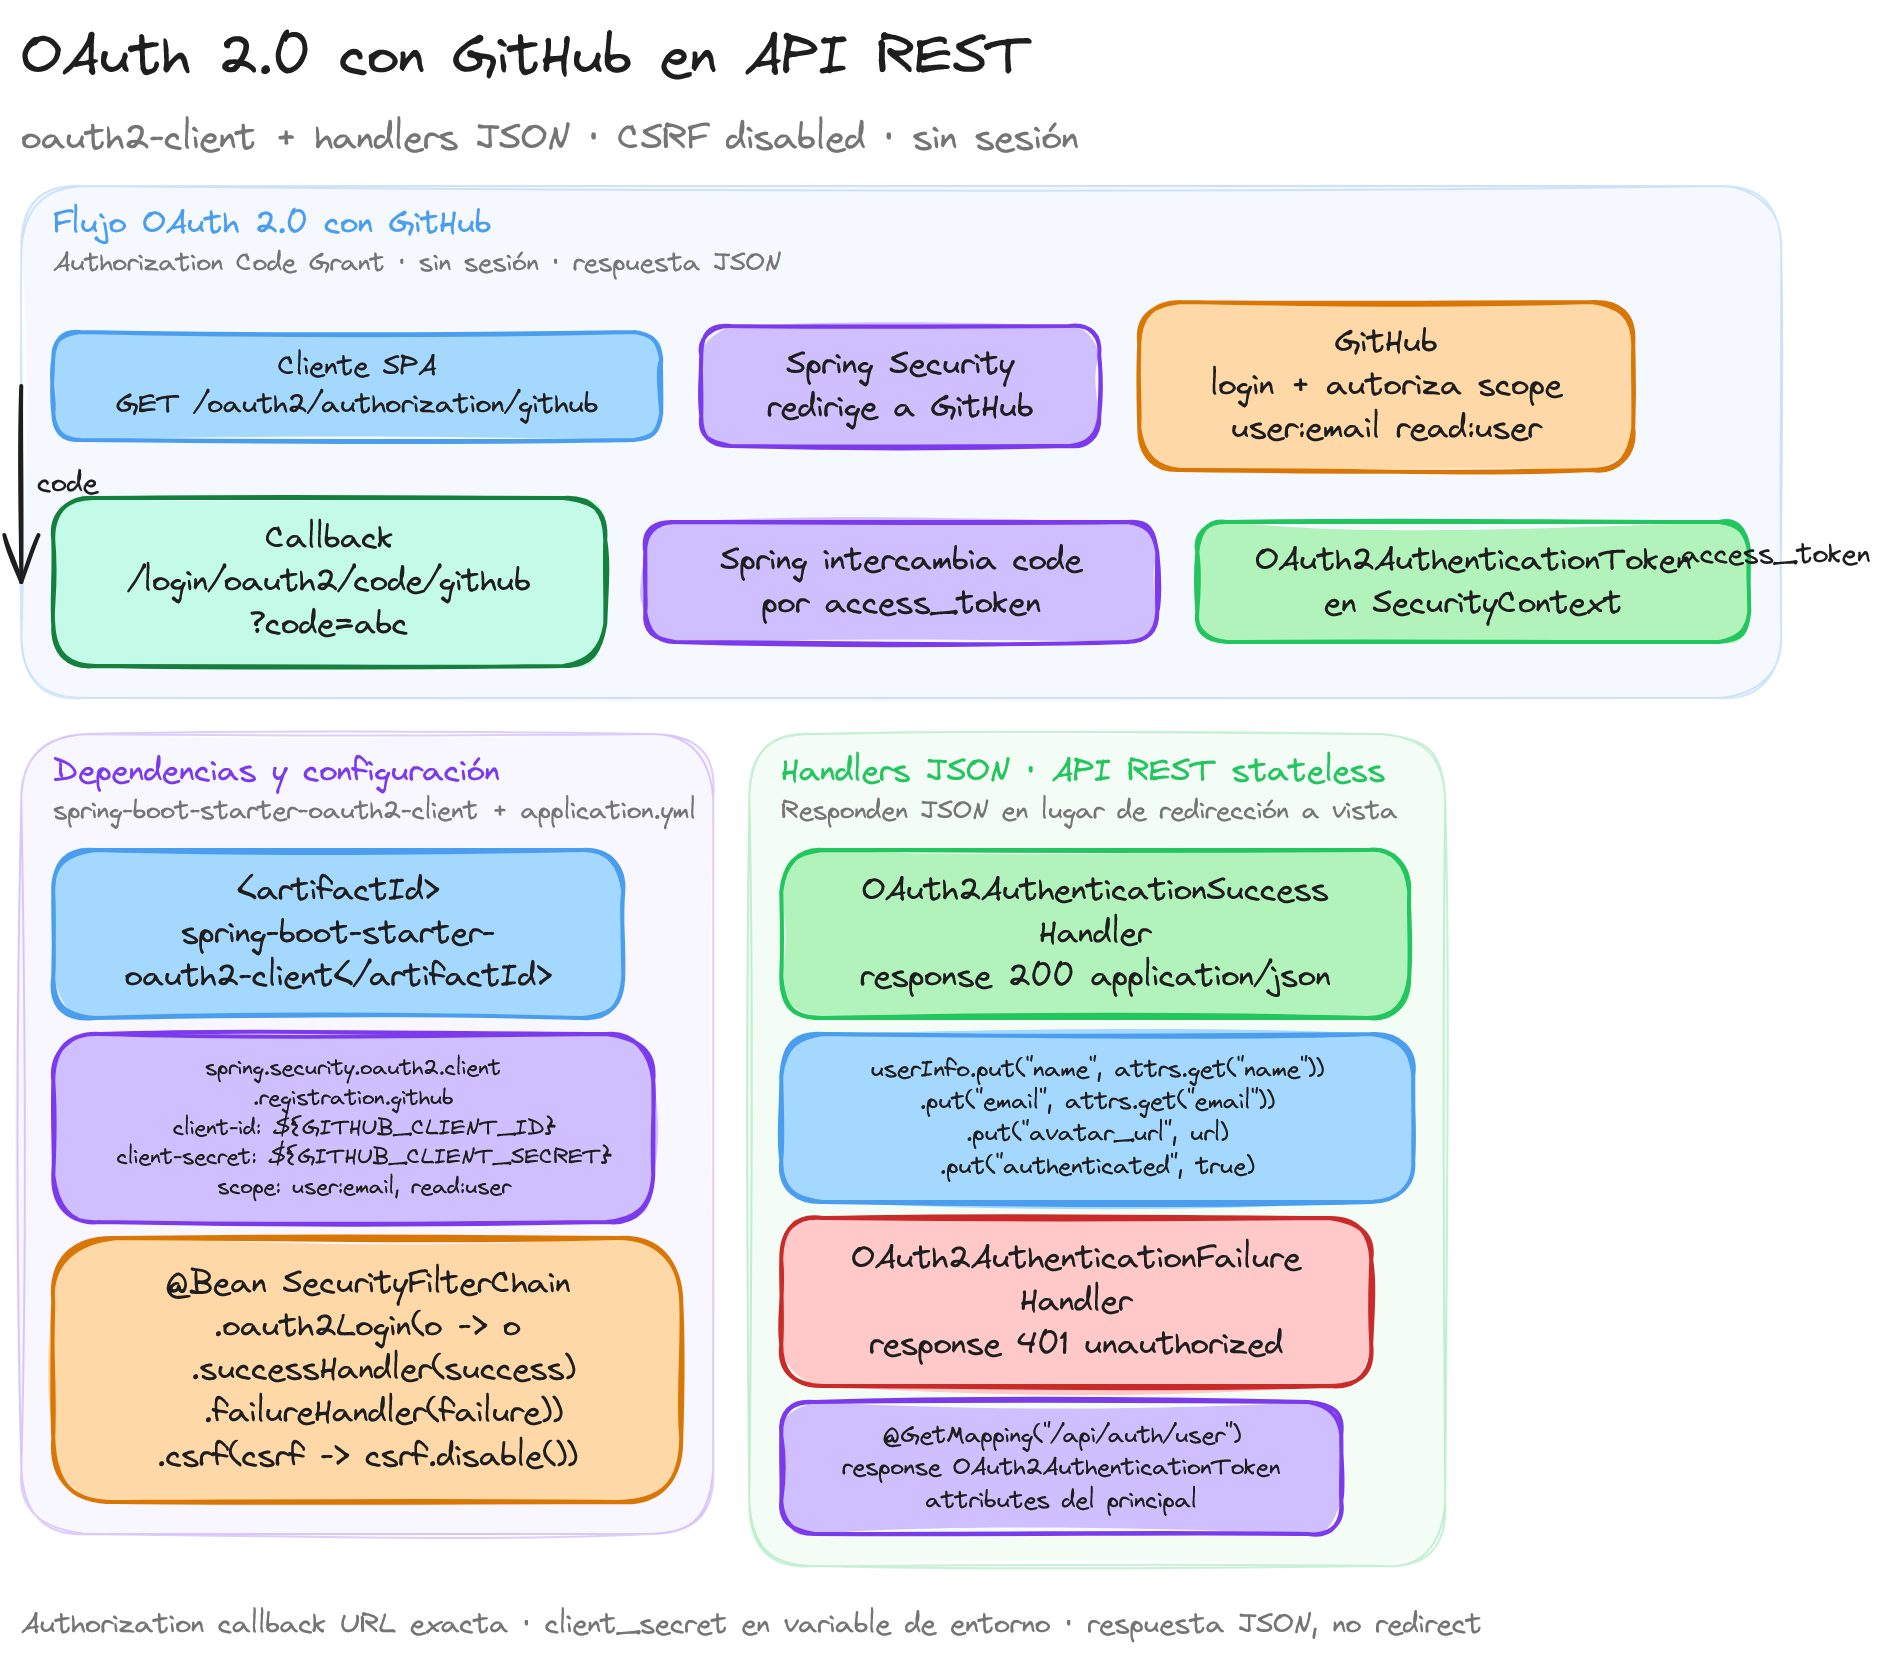
La implementación de OAuth 2.0 con GitHub en una API REST de Spring Boot requiere configurar tanto el cliente OAuth como los endpoints de seguridad. A diferencia de las aplicaciones web tradicionales, nuestra API REST devolverá respuestas JSON y manejará la autenticación de forma stateless.
Configuración inicial del proyecto
Primero necesitamos agregar las dependencias necesarias en nuestro pom.xml:
<dependency>
    <groupId>org.springframework.boot</groupId>
    <artifactId>spring-boot-starter-web</artifactId>
</dependency>
<dependency>
    <groupId>org.springframework.boot</groupId>
    <artifactId>spring-boot-starter-security</artifactId>
</dependency>
<dependency>
    <groupId>org.springframework.boot</groupId>
    <artifactId>spring-boot-starter-oauth2-client</artifactId>
</dependency>
Configuración de GitHub OAuth App
Para conectar con GitHub, necesitamos registrar nuestra aplicación en GitHub y obtener las credenciales OAuth. Ve a GitHub Settings > Developer settings > OAuth Apps y crea una nueva aplicación con:
- Application name: Tu nombre de aplicación
- Homepage URL:
http://localhost:8080 - Authorization callback URL:
http://localhost:8080/login/oauth2/code/github
GitHub te proporcionará un Client ID y Client Secret que necesitaremos para la configuración.
Configuración de propiedades
En application.yml, configuramos los parámetros de OAuth:
spring:
  security:
    oauth2:
      client:
        registration:
          github:
            client-id: ${GITHUB_CLIENT_ID}
            client-secret: ${GITHUB_CLIENT_SECRET}
            scope:
              - user:email
              - read:user
        provider:
          github:
            authorization-uri: https://github.com/login/oauth/authorize
            token-uri: https://github.com/login/oauth/access_token
            user-info-uri: https://api.github.com/user
            user-name-attribute: id

server:
  port: 8080
Configuración de Spring Security
Creamos la clase de configuración que define cómo manejar la autenticación OAuth:
@Configuration
@EnableWebSecurity
public class SecurityConfig {

    @Bean
    public SecurityFilterChain filterChain(HttpSecurity http) throws Exception {
        http
            .authorizeHttpRequests(authz -> authz
                .requestMatchers("/", "/login", "/error").permitAll()
                .anyRequest().authenticated()
            )
            .oauth2Login(oauth2 -> oauth2
                .successHandler(authenticationSuccessHandler())
                .failureHandler(authenticationFailureHandler())
            )
            .logout(logout -> logout
                .logoutSuccessUrl("/")
                .permitAll()
            )
            .csrf(csrf -> csrf.disable());

        return http.build();
    }

    @Bean
    public AuthenticationSuccessHandler authenticationSuccessHandler() {
        return new OAuth2AuthenticationSuccessHandler();
    }

    @Bean
    public AuthenticationFailureHandler authenticationFailureHandler() {
        return new OAuth2AuthenticationFailureHandler();
    }
}
Manejadores de autenticación
Implementamos manejadores personalizados para responder con JSON en lugar de redirecciones:
@Component
public class OAuth2AuthenticationSuccessHandler implements AuthenticationSuccessHandler {

    @Override
    public void onAuthenticationSuccess(HttpServletRequest request,
                                      HttpServletResponse response,
                                      Authentication authentication) throws IOException {

        OAuth2AuthenticationToken token = (OAuth2AuthenticationToken) authentication;
        Map<String, Object> attributes = token.getPrincipal().getAttributes();

        // Crear respuesta JSON con información del usuario
        Map<String, Object> userInfo = new HashMap<>();
        userInfo.put("name", attributes.get("name"));
        userInfo.put("email", attributes.get("email"));
        userInfo.put("avatar_url", attributes.get("avatar_url"));
        userInfo.put("authenticated", true);

        response.setContentType("application/json");
        response.setStatus(HttpStatus.OK.value());

        ObjectMapper mapper = new ObjectMapper();
        response.getWriter().write(mapper.writeValueAsString(userInfo));
    }
}
@Component
public class OAuth2AuthenticationFailureHandler implements AuthenticationFailureHandler {

    @Override
    public void onAuthenticationFailure(HttpServletRequest request,
                                      HttpServletResponse response,
                                      AuthenticationException exception) throws IOException {

        Map<String, Object> errorResponse = new HashMap<>();
        errorResponse.put("error", "authentication_failed");
        errorResponse.put("message", "No se pudo autenticar con GitHub");
        errorResponse.put("authenticated", false);

        response.setContentType("application/json");
        response.setStatus(HttpStatus.UNAUTHORIZED.value());

        ObjectMapper mapper = new ObjectMapper();
        response.getWriter().write(mapper.writeValueAsString(errorResponse));
    }
}
Controlador REST para manejo de autenticación
Creamos un controlador que proporciona endpoints REST para la autenticación:
@RestController
@RequestMapping("/api/auth")
public class AuthController {

    @GetMapping("/user")
    public ResponseEntity<Map<String, Object>> getCurrentUser(Authentication authentication) {
        if (authentication == null || !authentication.isAuthenticated()) {
            return ResponseEntity.status(HttpStatus.UNAUTHORIZED)
                .body(Map.of("authenticated", false));
        }

        OAuth2AuthenticationToken token = (OAuth2AuthenticationToken) authentication;
        Map<String, Object> attributes = token.getPrincipal().getAttributes();

        Map<String, Object> userInfo = new HashMap<>();
        userInfo.put("id", attributes.get("id"));
        userInfo.put("name", attributes.get("name"));
        userInfo.put("email", attributes.get("email"));
        userInfo.put("avatar_url", attributes.get("avatar_url"));
        userInfo.put("authenticated", true);

        return ResponseEntity.ok(userInfo);
    }

    @GetMapping("/status")
    public ResponseEntity<Map<String, Object>> getAuthStatus(Authentication authentication) {
        boolean isAuthenticated = authentication != null && authentication.isAuthenticated();

        return ResponseEntity.ok(Map.of(
            "authenticated", isAuthenticated,
            "provider", isAuthenticated ? "github" : null
        ));
    }
}
Controlador de recursos protegidos
Ejemplo de un controlador que requiere autenticación para acceder:
@RestController
@RequestMapping("/api/protected")
public class ProtectedController {

    @GetMapping("/profile")
    public ResponseEntity<Map<String, Object>> getUserProfile(Authentication authentication) {
        OAuth2AuthenticationToken token = (OAuth2AuthenticationToken) authentication;
        Map<String, Object> attributes = token.getPrincipal().getAttributes();

        // Procesar información adicional del usuario
        Map<String, Object> profile = new HashMap<>();
        profile.put("username", attributes.get("login"));
        profile.put("company", attributes.get("company"));
        profile.put("location", attributes.get("location"));
        profile.put("public_repos", attributes.get("public_repos"));
        profile.put("followers", attributes.get("followers"));

        return ResponseEntity.ok(profile);
    }

    @GetMapping("/dashboard")
    public ResponseEntity<Map<String, Object>> getDashboard(Authentication authentication) {
        String username = authentication.getName();

        Map<String, Object> dashboard = new HashMap<>();
        dashboard.put("welcome_message", "Bienvenido " + username);
        dashboard.put("last_login", new Date());
        dashboard.put("permissions", List.of("read", "write"));

        return ResponseEntity.ok(dashboard);
    }
}
Página de inicio para OAuth
Para facilitar el flujo de autenticación, creamos un endpoint simple que inicie el proceso:
@Controller
public class LoginController {

    @GetMapping("/")
    public ResponseEntity<Map<String, String>> home() {
        Map<String, String> response = new HashMap<>();
        response.put("message", "API REST con OAuth GitHub");
        response.put("login_url", "/oauth2/authorization/github");
        response.put("status_url", "/api/auth/status");

        return ResponseEntity.ok(response);
    }

    @GetMapping("/login")
    public void login(HttpServletResponse response) throws IOException {
        // Redirige automáticamente a GitHub OAuth
        response.sendRedirect("/oauth2/authorization/github");
    }
}
Variables de entorno
Para mayor seguridad, configura las credenciales como variables de entorno:
export GITHUB_CLIENT_ID=tu_client_id_aqui
export GITHUB_CLIENT_SECRET=tu_client_secret_aqui
O crea un archivo .env en el directorio raíz del proyecto:
GITHUB_CLIENT_ID=tu_client_id_aqui
GITHUB_CLIENT_SECRET=tu_client_secret_aqui
Flujo de autenticación
El flujo completo funciona de la siguiente manera:
- 1. El usuario accede a
/logino/oauth2/authorization/github - 2. Spring Security redirige a GitHub para autenticación
- 3. GitHub redirige de vuelta con el código de autorización
- 4. Spring Security intercambia el código por un token de acceso
- 5. Se obtiene la información del usuario desde la API de GitHub
- 6. El usuario queda autenticado y puede acceder a endpoints protegidos
Esta implementación proporciona una base sólida para integrar OAuth 2.0 con GitHub en tu API REST, manteniendo la simplicidad mientras ofrece la funcionalidad necesaria para autenticar usuarios de forma segura.
Fuentes y referencias
Documentación oficial y recursos externos para profundizar en Spring Security
Documentación oficial de Spring Security
Alan Sastre
Ingeniero de Software y formador, CEO en CertiDevs
Ingeniero de software especializado en Full Stack y en Inteligencia Artificial. Como CEO de CertiDevs, Spring Security es una de sus áreas de expertise. Con más de 15 años programando, 6K seguidores en LinkedIn y experiencia como formador, Alan se dedica a crear contenido educativo de calidad para desarrolladores de todos los niveles.
Más tutoriales de Spring Security
Explora más contenido relacionado con Spring Security y continúa aprendiendo con nuestros tutoriales gratuitos.
Aprendizajes de esta lección
Comprender cómo configurar una aplicación OAuth en GitHub para obtener credenciales. Aprender a integrar OAuth 2.0 en una API REST con Spring Boot y Spring Security. Configurar manejadores personalizados para respuestas JSON en autenticación exitosa o fallida. Crear controladores REST que gestionen la autenticación y acceso a recursos protegidos. Entender el flujo completo de autenticación OAuth 2.0 con GitHub en un entorno stateless.